Ackee & Saltfish

Apr 10, 2012 by

Ackee, oh Ackee. Ackee is Jamaica’s national fruit. Ackee paired with Saltfish (Salted Codfish) is Jamaica’s National Dish. This is a dish that is near and dear to my heart, as my Mother always prepared it for my family on the weekend. She makes it so very well. I remember having to “flake” the saltfish (not often, a few times perhaps) to remove the bones and to reduce them into smaller pieces the night before for easy preparation in the morning. I hated having to pick out the bones, but boy did I enjoy eating it! I was in the mood for traditional Jamaican fare so I gathered my ingredients to make Ackee and Saltfish served with fried Bammy and fried Plantains.


Ackee and Saltfish with Bammy and Plantain


5.0 from 3 reviews
Ackee & Saltfish
 
Prep time
Cook time
Total time
 
Jamaica's National Dish, Suitable for Breakfast, Lunch or Dinner. It can be served with Fried Dumplings, Boiled Dumplings, Fried Bammy, Boiled Banana, Fried Plantains, Boiled Yam, Roast Yam or White Rice
Author:
Recipe type: Breakfast, Lunch, Dinner
Serves: 6
Ingredients
  • 2 Dozen Ackees (or 2 Tins of Ackee)
  • ½lb Salted Codfish
  • ¼ Cup Coconut Oil (or vegetable oil)
  • 1 Medium Tomato, chopped
  • 1 Red Sweet Pepper, chopped
  • 1 Green Sweet Pepper, chopped
  • 1 Onion chopped, or thinly sliced
  • Salt and Pepper
  • A few Pimento seeds (optional)
  • 1 Tsp All Purpose Seasoning (optional)
  • A pack of Bammy (8 small round Bammies)
  • 1 Ripe Plantain
  • 1 Cup Milk
  • 1 Tbsp Sugar
  • 2 Tbsp vegetable Oil
  • 1 Tbsp Butter
  • Oil for frying the plantain
Instructions
  1. Soak the saltfish overnight in a covered pot. In the morning, pour off the water. Add fresh water and bring to a boil. Taste the fish to ensure that most of the salt has been boiled off. If it is very salty, pour off the water, add fresh water and boil again. This should be enough. The saltfish should not be bland. Pour off water and allow to cool. Using your fingers, break the fish into small pieces while removing any present bones. Be careful, the bones can be very small. You should end up with a heaping cup full of flaked saltfish.
  2. If using canned ackees, drain liquid from the ackees and add to a pot of boiling water for about 2-3 minutes. Drain and set aside.
  3. If using fresh ackees, boil in salted water for about 15 minutes, or until ackees can be pierced with no resistance with a fork. Do not overcook. Drain and set aside
  4. In a large skillet or dutch oven, warm the oil over medium heat
  5. Add onion, tomatoes and sweet peppers. Sauté until softened about 5 minutes
  6. Add saltfish and stir to combine
  7. Add ackee to the pot
  8. Add salt and pepper
  9. Give a gentle stir so that you don't break up the ackee
  10. Cover and allow to simmer for about 15 minutes
  11. Gently stir to fully combine. Season with salt and pepper to taste
  12. For the bammies:Dissolve sugar in a cup of milk. Pour into a shallow dish. Place bammies into the milk and leave for about 5 minutes. Flip onto the other side. The bammy will absorb the milk.
  13. In a medium-hot skillet with oil, fry the soaked bammy in oil and butter until golden brown, about 8 minutes on each side
  14. Place on a paper towel to soak up oil from the bammy. Set aside
  15. Thinly slice the plantain on the diagonal. Fry each piece in hot oil until brown on both sides. Place on paper towel to absorb oil
  16. Serve and enjoy
Notes
Be careful not to overcook the ackee as it will get extremely soft and turn into mush If you do not have saltfish available, crispy bacon is a great substitute. Just fry and break into bits. A whole Scotch Bonnet pepper is an optional ingredient and would be added along with the ackee and allowed to simmer. Remove before serving, taking care not to pierce the pepper


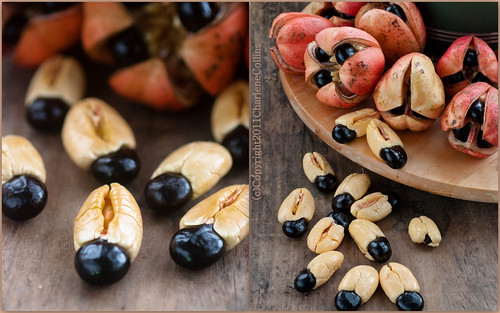
Charlene, a friend and a Jamaican photographer, has allowed me to use her photograph of Ackee in the pods so I can share with you all. This is not something that you can see in North America. I grew up with an Ackee tree on my family property so I saw this often. Here in Canada (and in the United States), you buy Ackee from the tin. I’ve had it an it is not at all bad. It’s a great way to still have Ackee.

To see more of Charlene’s beautiful photography, please click on the photograph.
Fresh - Ackee


Soak the saltfish overnight, or at least for a few hours. I soaked mine overnight then started the boiling process in the morning to reduce the salt. The fish should still have a certain amount of salty taste to it, otherwise it won’t taste great and then you’ll have to add salt back to the dish. In this photograph, I have about a pound of saltfish but I only used half. I reserved the other half for another special recipe.


Boiled Saltfish (Salt Cod)


Lovely fresh ingredients (I didn’t end up using the scallion)


Sweet Peppers, Onion, Tomato, Scallion


The main ingredients:


Bammy is a thick version of a flatbread made from cassava. Bammies can be soaked in either milk or coconut milk. Then it can be baked or fried until browned and cooked through. It has a very light and delicate taste and can be enjoyed with a variety of meals. It’s great for soaking up gravy!


Bammies soaked in milk


Such an amazing aroma.


Vegetables in the pot


Ackee and Saltfish are cooked though, and ready to be served


Ackee and Saltfish


Ackee and Saltfish is likely to be served with fried dumplings. My Mom is an expert at making fried dumplings. I have yet to try my hand at that so Bammies are where it’s at until I  try the dumplings. This is generally a breakfast dish, but I have had it for dinner too, as I did here.


Ackee, Saltfish, Bammy, Plantains


I hope you enjoyed today’s post. I really like making traditional Jamaican dishes and sharing with everyone. I don’t generally prepare traditional meals but I’m willing to try every now and again.

Have a super week!

~Lyn


read more

Escoveitched Halibut

Apr 8, 2012 by

In continuing with the theme of Easter, I wanted to try a fish recipe that reminds me of  home but at the same time utilizing a fish that is familiar to most in the region where I live. Halibut is a really fresh, firm white fish that is rich in lean protein, Omega 3 Fatty Acids, B Vitamins and  Magnesium. Having said all that, I’m going to fry it! I don’t fry very often so I don’t feel bad at all. Moderation is key. In Jamaica, fried fish is one of my most favourite things to eat. This particular recipe includes a fried fish, covered with a vegetable/vinegar topping that rests over the fish for a few hours before the fish is served. I used Scotch Bonnet Pepper for the first time. I guess I’m getting really brave because I don’t tolerate “heat” very well!

I’m so glad I had my Mom to consult with on this recipe. I got the basic idea of the ingredients and then I put my little twist on it. Nothing major – it’s still Escoveitch 🙂 A friend of mine shared a very good tip with me about frying the fish- ensure the oil is very hot, and use very little flour on the fish. My fish was perfectly fried.

Escoveitched Halibut


Escoveitch or Escabeche is derived from Mediterranean origins and refers to fish (or some other white meat) being marinated in an acidic sauce or liquid prior to serving. In Jamaica, the vegetables are cooked down in a vinegar and water mixture and then poured over the fish, and allowed to marinate overnight or for a few hours. I could not wait for it to marinate so I ate my serving fresh from the pot and put the rest in the fridge for a more concentrated flavour.


Escoveitched Halibut
 
Prep time
Cook time
Total time
 
A Jamaican dish that can be served for breakfast, lunch or dinner
Author:
Recipe type: Breakfast, Dinner, Lunch
Serves: 4
Ingredients
  • 4 Halibut Fillets
  • ¼ Cup Flour seasoned with salt and pepper
  • Oil for frying the fish {about ¼-inch deep}
  • 1 Lime to wash the fish
  • 4 Tbsp White Vinegar
  • 4 Tbsp Water
  • 4 Tbsp Vegetable Oil
  • 1 Tsp Sugar
  • Pinch of salt
  • 1 Carrot, julienned
  • 1 Sweet Green Pepper, julienned
  • ½ Zucchini, julienned
  • 1 Small Onion, thinly sliced
  • ½ Scotch bonnet pepper, thinly sliced
  • 6-8 Pimento Berries
Instructions
  1. Wash the fish with water and juice from the lime
  2. Pat dry with a paper towel. Dust with seasoned flour. Fry and set aside
  3. In a warm skillet, add oil
  4. Add Onion, Carrot, Sweet Pepper, Scotch Bonnet Pepper, Pimento.
  5. Stir to soften vegetables
  6. Add vinegar, salt and sugar
  7. Add zucchini and a little water
  8. Allow to cook for about 15 minutes until the vegetables are softened
  9. Pour over fried fish
  10. Allow to marinade for a few hours
  11. Serve at room temperature
Notes
Alternative way to cook Escoveitch: Bring a cup of water and a cup of vinegar to a boil. Add vegetables, pepper, salt, sugar and pimento and cook until softened. Pour over fried fish and allow to marinade overnight or a few hours The Scotch Bonnet pepper can be cut up or placed in whole then removed before pouring other the fish


This was the hardest part of the entire recipe. Slicing up all these veggies!!!


Vegetables for the Escoveitch


Washing fish in lime or lemon is very important. So I’ve been told. It helps to reduce the fishy smell, but I prefer fish that have a mild smell so I don’t usually wash with lime. I did for Escoveitch.


Lime and Halibut


Remember! Not too much flour…


Halibut in Seasoned Flour


I’m terrified of frying. Hot oil is no joke!


Halibut in oil


One side finished, no injuries so far 🙂


Halibut Golden Brown


Seriously, I could really get into frying stuff.


Fried Halibut


The colours were so vibrant and the smell was fantastic! You must believe!


Sweet Peppers, Carrot, Onion, Zucchini, Pimento, Scotch Bonnet Pepper


This dish is good for breakfast or dinner. It can be served with Fried Dumplings, Fried Breadfruit, or Fried Bammy!


Fried Halibut with Escoveitch Sauce


If you do make this dish, don’t be afraid to put more vinegar and water. This is my personal version that suits my palate and I get more of the vegetable flavour.  To get the real kick ~ use more vinegar and the whole scotch bonnet pepper. Leave it overnight.


I have a few more recipes like this to share then I have to make a date with my treadmill.

~Lyn


read more

Easter Muffins

Apr 7, 2012 by

It has been a busy few days and I’m just getting to post this now. The kids were tugging at my legs to get at these little treats. I did not decorate all the muffins because, well… my kids do a really cute thing. They eat the frosting and then say “Mommy! I’m finished!” – and they literally leave the muffin behind. Seriously. If there is frosting, more than likely, they will not eat the cake. Maybe this little thing they do isn’t so cute after all.

I found this recipe in a little book called “100 Muffins From 1 Easy Recipe”. Chances are, I’m going to make every muffin in this book. What caught my eye about this recipe was not necessarily the theme, even though I was certainly looking for an Easter recipe. The cupcakes were adorable! Very simple, compared to what I’ve seen out there, but adorable none the less. I will be the first to say it out loud that I’m not the best at decorating cakes. I only just started a few months ago (barely). I’m teaching myself so that I can at least do something, if needed. Practice makes perfect. I did my best so here’s my first Easter Muffin 🙂


Easter Muffins - Chocolate Muffins with Nest Frosting and Mini Chocolate Eggs


5.0 from 2 reviews
Easter Muffins
 
Prep time
Cook time
Total time
 
A simple chocolate muffin, decorated with a simple frosting and mini chocolate eggs for Easter
Author:
Recipe type: Dessert
Serves: 12
Ingredients
  • 1½ Cups All Purpose Flour, Unbleached
  • ½ Cup Unsweetened Cocoa Powder
  • ⅛ Tsp Salt
  • ½ Cup Light Brown Sugar
  • 2 Large Eggs
  • 1 Cup Buttermilk
  • 6 Tbsp Sunflower Oil or Melted Butter (cooled)
  • Frosting:
  • 6 Tbsp Butter, Softened
  • 1½ Cups Confectioners' Sugar
  • 1 Tbsp Milk
  • A small pack of Sugar Coated Mini Chocolate Eggs, to decorate
Instructions
  1. Preheat oven to 400F
  2. Grease a 12 cup muffin pan or line with liners
  3. Sift together flour, cocoa, baking powder and salt into a large bowl
  4. Stir in the brown sugar
  5. Lightly beat eggs in a large measuring jug. Beat in the buttermilk and oil
  6. Make a well in the centre of the dry ingredients and pour in the buttermilk liquid
  7. Stir until just combined. Do not over mix
  8. Spoon the batter into the prepared muffin pan
  9. Bake for 20 minutes
  10. Allow muffins to cool in the pan for about 5 minutes then transfer to wire rack to cool completely
  11. Frosting:
  12. In a large bowl, beat the butter until light and fluffy
  13. Sift in the confectioners' sugar and beat together until smooth and creamy
  14. Lastly, beat in the milk
  15. When the muffins are cooled completely, put the frosting in a pastry bag with a large star tip attached and pipe a circle around the top of each muffin to form a "nest"
  16. Place chocolate eggs in the centre of each nest as decoration


I found these a few weeks ago. So perfect! I love that they are reusable and colourful too.


Silicone Muffin Liners


I wore my apron to do this. I’ve been powdered up by Cocoa one time too many! 🙂


Sifting the flour, cocoa, baking powder and salt


So this recipe called for only 1/2 Cup of brown sugar. The muffins were not overly sweet so I can see myself adding chocolate chips to this recipe in the future. No frosting needed, of course.


Fold in the brown sugar


Muffin batter ready for the oven


These came out quite wonky to me 🙂 The photograph in the book looked waaaaaay better than mine. A+ for effort though, right? 🙂


Easter Muffins, decorated


And then my Diva daughter decided that she did not want the cupcake with the mini chocolate eggs. Actually, she said that they were not in fact cupcakes because they had no sprinkles on them. She pointed to where I keep the sprinkles and requested that I make “real” cupcakes for her so that she could eat it.

Well excuse me.

The sprinkle princess had her way.


Cupcakes with Sprinkles


Take good care of you

~Lyn


read more

Jamaican Easter Bun

Apr 5, 2012 by

I wanted to make something Jamaican for Easter. I couldn’t think of anything more appropriate than Bun and Cheese. It’s a Jamaican tradition! I’ll be cooking all this weekend so this is the first of interesting things to come. I remember as a child living in England, my parents made Easter Bun and it made our home smell so fragrant. I was super excited when my Mom found the recipe that she had used all those years ago. I’m using some of the ingredients for the first time with this recipe. I’m glad I now have things like Anise Seeds in my pantry for future recipes. And I would have never guessed that I would be cooking with Dragon Stout again so soon!

This Bun smelt good in a traditional way. I personally prefer my bun with just raisins and not the mixed peel. But I really wanted to make it as traditional as possible. After looking at a few other recipes, this particular recipe uses Anise Seeds which is not included in modern Bun recipes. I’m fine with that. That means my recipe is special.

In Jamaica, Bun is a big deal. It is generally available throughout the year. If you usually buy Bun at the store, and have not yet purchased some by now – you may very well have missed out. Good thing I have this here recipe for you to actually MAKE Bun 🙂 That way, you won’t miss out. 🙂

I was asking some friends and family about the origins of Jamaican Easter Bun… it’s a tradition that not too many people are familiar with. Thanks to my Bestie for sending me the info as to how Jamaican Bun came about. The British traditionally had Hot Crossed Buns on Good Friday. This same custom was brought to Jamaica and transformed into what we know today as Easter Bun. Jamaicans spiced it up!

“Jamaica’s version is made with molasses, while the buns from England were made with honey. In Jamaica, you eat the bun with cheese, a combination that has become ingrained in island culture. British custom has waned when it comes to eating hot cross buns as fasting food on Good Friday, but in Jamaica the practice is as prevalent as ever. Today the custom is seen as more Jamaican than British. And eating cheese is now a year-round practice, while the bun and cheese dish is prevalent primarily during the Easter holiday.” – An excerpt from an article found on Jamaicans.com


Bun & Cheese


Jamaican Easter Bun

Prep Time: 20 minutes

Cook Time: 1 hour

Total Time: 1 hour, 20 minutes

Yield: 10-12 slices

Ingredients

  • 1 ½ Cups Brown Sugar
  • 3 Cups Flour
  • 2 Tsp baking powder
  • 1 Cup Dragon Stout
  • 2 Tbsp melted butter
  • 1 Egg
  • 2 Tsp Anise seed, divided
  • 4 Tbsp molasses
  • ¼ Cup honey
  • 2 Tsp Allspice
  • 1 Cup mixed fruits and raisins
  • 1/4 Cup Sugar
  • 3 Tbsp Water

Instructions

  1. Dissolve sugar, butter, honey syrup and spices into Stout over medium heat
  2. In a large bowl, sift in flour then fold in fruits
  3. Beat egg then add to the flour mixture. Stir to combine
  4. Add Stout mixture to flour and half of Anise seeds
  5. Put in a greased pan lined with parchment paper
  6. Sprinkle rest of Anise seeds on top
  7. Bake at 350 F for 1 hour or until done
  8. Remove from oven.
  9. Make a glaze – Combine¼ Cup sugar and 3 tablespoons of water in a small bowl
  10. Brush on to bun

Notes

Once Bun has cooled, cover with saran wrap or keep in a zip lock bag in order to maintain moisture

https://lovelypantry.com/2012/04/jamaican-easter-bun/


This is the one cheese I have a severe weakness for. I’ll eat it any day of the week! It’s so terribly expensive here in Canada though. If it wasn’t for this post, I would have left it right there on the shelf. I’ve been delaying my cheese fix for when I visit Jamaica.


Only the BEST Cheese in the WORLD!


Dragon Stout, Guinness or Red Stripe Beer can all be used to make Bun.


Dragon Stout


Stout mixture reduced to a simmer.


Stout Mixture


Flour, Mixed Fruits, Raisins and Anise Seeds


Flour, Mixed Fruits and Anise Seeds


Stout mixture combined with flour mixture


Stout added to flour


Ready for the oven.


Easter Bun Batter sprinkled with Anise Seeds


The house smelled wonderful!


Bun – Fresh Out The Oven


Sugar & Water Glaze


First Slice


Bun and Cheese


Making this for the first time was great. The kids loved it. My husband was appreciative. He LOVES this stuff. I bet you next year, he’s going to be looking out for his Easter Bun.


Shout out to my Mom! Thanks for keeping this recipe safe so that I could do the unexpected and actually use it!!! *hugs*

I love my Mom.


For those that celebrate, have a happy and blessed Easter.

~Lyn

***

Other Buns you may like to try:

Sweet Potato Bun

Jamaican Easter Spiced Bun

Zucchini Spiced Bun

read more

Food Blogger Fun and Awards

Apr 2, 2012 by

Good Monday morning to you, my friends! Today’s post is different – no recipe. No photographs. No drooling or licking your computer screen 🙂 I just want to share some great things with you today. Regular posts will resume in a day or two. The past few months have been a blast when it comes to Food Blogging and Twitter. For a few months, I was on a roll! I was doing at least 4-6 chats weekly. Due to my new family schedule, I’m down to one chat – #HGEATS with The Hungry Goddess, Wednesdays at 12 noon, EST. Feel free to drop in for the hour, if you’re available. Each week is a different food related topic and we always have tons of foodie fun! If you’re lucky, there may be giveaways! I’ve won twice already! Lucky me!

I’m happy to have made some online foodie friends who have become familiar faces on a few other social media platforms. I’ve recently become a member of the Food Bloggers Network founded by the lovely Jessica Hose. She’s so brilliant to have come up with a networking group that allows Food Bloggers to share and learn more about what we do. It’s a wonderful support group and I’m very glad to be a part of it, along with such great bloggers. This group definitely keeps me active and in touch with like-minded individuals. Love it!

I’m so happy, and honoured to have been given awards by my fellow food bloggers! Isn’t that wonderful? [Insert applause here]

I received the Versatile Blogger Award from these fantastic friends:


Susan from Girl In The Little Red Kitchen

Renee from Magnolia Days 

Jessica from Oh Cake

Sofie from The German Foodie

I encourage you to visit their blogs! They are a friendly bunch!


I received the Kreativ Blogger Award from these fabulous ladies:


Susan from Girl In The Little Red Kitchen

Renee from Magnolia Days 

Jessica from Oh Cake

I enjoy their recipes and stories. Please visit and say “hello!”


As a recipient of the Kreativ Award, I have to write 10 facts about myself, then pass along the award to 6 bloggers


1o facts about Lyn

  1. I have lived in 3 countries – London, England. Kingston, Jamaica. I currently reside in Toronto, Canada.
  2. My passion is photography. The sound of the shutter gives me life.
  3. I can be found (as in “seen”) in the deleted scenes on the DVD of the movie titled “How To Lose A Guy In 10 Days” staring starring Kate Hudson and Matthew McConaughey
  4. I studied Travel, Tourism & Hospitality in College. The low paying jobs turned me off. I still love the field though.
  5. I dream of vacations in beautiful places with beautiful food, camera in tow. One day, I will be a Travelista!
  6. I love technology. If I could buy every device my heart desires, I probably would.
  7. I’m a lifelong learner (a trait inherited from my Mother)
  8. I love sending and receiving snail mail. YES! I’ll actually write a letter or a card and send photographs.
  9. I believe in these simple things: the words please and thank you. Honesty & kindness CAN co-exist. Treat people with respect.
  10. I LOVE music. In fact, I cook, sing AND dance sometimes. Fun times in my house.


I also received the Sunshine Award from these awesome chicas!!!


Susan from Girl In The Little Red Kitchen

Renee from Magnolia Days 

Jessica from Oh Cake

You ladies are my sunshine! Thank you for these awesome awards!!


As a recipient of the Sunshine Award, I have to answer 10 questions, nominate other wonderful bloggers and leave a link back on their website.

  • Favorite Color – Purple and Black
  • Favorite Animal – I don’t have one, but I think very small dogs are cute
  • Favorite Number – I don’t have one, but I prefer even numbers or odd numbers divisible by 5 (don’t ask lol)
  • Favorite Non-Alcoholic Drink – White Cranberry
  • Prefer Facebook or Twitter – Twitter RULES!!! But I’m trying to be more active on Facebook too. Come say hello!
  • My Passion – Family, Photography, Food/Cooking, Travel
  • Prefer Getting or Giving Presents – Giving (and receiving too)
  • Favorite Pattern – Whatever looks good
  • Favorite Day of the Week – The glorious day that I can sleep in, whichever day that may fall on
  • Favorite Flower – Roses and Tulips


I would like to share the love, and pass all three awards to these fabulous bloggers:


I received The Fabulous Blog Award from Tina at Pinay Cooking Corner  – Thanks again, Tina! I know I’m late but I’m so grateful for this award from you!


I would like to pass this award to Angie from Angie’s Recipes whose recipes and photography inspire me.


I received the Liebster Award from Kayle at The Cooking Actress ~ You’re so sweet, Kayle! Many thanks for this award 🙂

I would like to pass this award on to Susan at The Wimpy Vegetarian. I like Susan’s recipes and her writing. I think there’s a vegetarian inside me trying to get out!


There are so many blogs that I enjoy reading. Thank goodness for Google Reader. Perhaps I’ll have to do another award post. For now, please take the time to check out these blogs that I read frequently.

Have a wonderful 4 day week!


~Lyn


read more

Blueberry Muffins with Cinnamon Streusel & Blog Appreciation

Apr 1, 2012 by

One night late last week, I stayed up late to make muffins for my husband and his co-workers. They are doing an internal course in order to advance within the organization. Let me tell you. The work load is what I consider “University INTENSIFIED”. It’s a lot of work and pressure, especially for those who have families and responsibilities. Time management and balance is key. I thought it would be a nice gesture to send something home-made and not some sugar spiked junk from the coffee shop. They need nourishment as well as encouragement over the next few months and beyond. I figured blueberry muffins were portable and universally enjoyed.

I made these muffins for the first time over a year ago and my husband really liked it – we all did. I actually misplaced the recipe that I had found online. Do you know how many Blueberry Muffin recipes are online???? Luckily I found it (phew) and got to baking around 1am.

Yes, 1 AM.

I wanted to have the muffins as fresh as possible since this Diva doesn’t do early very well. Everyone enjoyed the muffins and my husband totally appreciated me making them for the guys. I’m sure he must have been very happy to wake up to that wonderful aroma of muffins at five o’clock in the morning. Thank you dear husband, for leaving a few muffins behind for the family to enjoy 🙂


Blueberry Muffins with Cinnamon Streusel


5.0 from 3 reviews
Blueberry Muffins with Cinnamon Streusel
 
Prep time
Cook time
Total time
 
Blueberry Muffins - everyone will enjoy them!
Author:
Recipe type: Dessert
Serves: 20
Ingredients
  • 2 Cups Blueberries (thawed if frozen)
  • 2 Tsp Unbleached All Purpose Flour
  • 2 Cups Unbleached All Purpose Flour
  • 2 Tsp Baking Powder
  • ½ Tsp Salt
  • ½ Cup Sugar
  • ½ Cup Vegetable Oil
  • ½ Cup Milk
  • 3 Eggs
  • Streusel:
  • 1 Tsp Pure Vanilla Extract
  • 2 Tbsp Brown Sugar
  • 1 Tbsp Terbinado Brown Sugar (optional)
  • 2 Tbsp Coconut Oil
  • 2 Tbsp Unbleached All Purpose Flour
  • ½ Tsp Cinnamon
Instructions
  1. Preheat oven to 350F
  2. In a small bowl, add Blueberries and 2 Tsp flour. Toss well and set aside
  3. For streusel: in a small bowl, add sugars, flour and cinnamon. Add coconut oil and combine with a fork. Set aside
  4. In a medium bowl, sift together 2 Cups flour, baking powder and salt
  5. In a large bowl, add sugar, oil, eggs, milk and vanilla. Mix well to combine
  6. Add dry ingredients to the wet and mix until just combined. Gently fold in blueberries
  7. Fill muffin cups about ⅔-3/4 full
  8. Take about a teaspoon of streusel and sprinkle on top of the batter in each filled muffin cup
  9. Bake for 30-40 minutes
Notes
Be sure not to skip the first step. Tossing your blueberries in flour will prevent them from sinking to the bottom of the batter. I used Terbinado sugar to give the streusel a nice crunch. It is optional and was not in the original recipe

This recipe is slightly adapted from a recipe found at The Family Kitchen on Babble


I prefer Blueberries cooked rather than fresh. Or in a smoothie. However I end up having them, I always enjoy it!


Blueberries


Blueberry Muffin with Cinnamon Streusel


Pretty Blueberry Muffins


I know, we don’t eat muffins with a fork. Well, I kinda do…sometimes.. 🙂


Muffin, unwrapped


Take a Big Blueberry BITE!


Bursting with Blueberries


Hey, speaking of appreciation… I’ve had some really awesome food bloggers give me some wonderful awards! I’m so humbled and thankful that my online foodie friends thought of me to give me these awards. So very humbled. I love what I do here at The Lovely Pantry and as I continue to grow, it’s really encouraging to know that there are people out there who understand what it takes to do this. We blog for many reasons including the love of food, the art of cooking, the love of sharing, the love of community and my personal favourite – photography. It feels great knowing that there are people cheering you on! I’m going to share the love in my next post.


Have a wonderful Sunday!

~Lyn


read more

Turkey and Potato Skillet

Mar 28, 2012 by

I’ve wanted to do a one-pot dish for some time now. I was tired of using ground turkey the same way all the time. Needless to say, it gets a little boring for everyone. Something new was definitely needed! Balance is always my goal, so there’s a good ratio of protein, starch and greens… and some sweet corn too, to brighten it up a bit. I love that the ingredients are what we know and love and that the recipe can be tweaked as needed. A versatile recipe is a good recipe. I also wanted a sweet sauce in the mix, to give a constant flavour throughout the entire dish, but not overpowering it. I’ve made this dish twice and I’m happy enough with the result to share with you here. It’s funny – when I’m freestyle cooking, I really need to write down what I do. The second time I made this I was hoping I got it right so that it would turn out just as good as it did the first time!


Turkey, White Potato, Sweet Potato, Sweet Peas


Turkey and Potato Skillet

Prep Time: 20 minutes

Cook Time: 30 minutes

Ingredients

  • 1 1/2 lb Lean Ground Turkey
  • 1 Onion, finely diced
  • 2 Cloves garlic, minced
  • 2 Tbsp Olive Oil
  • 1 Tbsp Oregano
  • 2 Tsp Dried Thyme
  • Salt & Pepper
  • 1/2 Cup Organic Ketchup (Or regular Ketchup is fine)
  • 3 Tbsp brown sugar
  • 1 Tbsp White Vinegar
  • 1/4 Cup Chicken Broth
  • 1 Large sweet Potato, cut into 1-inch cubes
  • 1 Large While Potato, cut into 1-inch cubes
  • 1 Cup Sweet Peas, thawed from frozen (or canned if you like)
  • 1/2 Cup Sweet Corn, thawed from frozen (or canned if you like)

Instructions

  1. In a hot skillet, add olive oil
  2. Add Onion, sauté until softened
  3. Add garlic, stir until softened
  4. Add Ground Turkey and use a spoon to break into small chunks
  5. Sprinkle salt, pepper, Thyme and Oregano. Stir to incorporate
  6. Brown the turkey for about 8 minutes on a medium-high heat
  7. In a small bowl or measuring cup, add ketchup, sugar, vinegar and broth
  8. Mix with a spoon until a smooth consistency is achieved
  9. Pour over the turkey, stirring to combine
  10. Add cubed potatoes, stir and cover over medium-low heat for about 15 minutes or until the potatoes are fully cooked
  11. Add the corn and peas and cover for another 5 minutes
  12. Stir to combine
https://lovelypantry.com/2012/03/turkey-and-potato-skillet/

5.0 from 1 reviews
 

Aside from the subtle sweetness of this dish, the colours are so appealing to me. I think I’m addicted to green. There HAS to be something green in my plate. I love sweet potatoes. White potato – not so much, but each has its special place in my diet. I was happy to join the two for this Turkey and Potato Skillet dish.


Turkey and Potatoes in skillet


Turkey and Potato Skillet


This was so easy to make and filled with colourful goodness. Perfect for a mid-week dinner!


Happy Wednesday!

~Lyn


Related Posts Plugin for WordPress, Blogger... read more
Post Popularity Graphing by Knowledge Ring