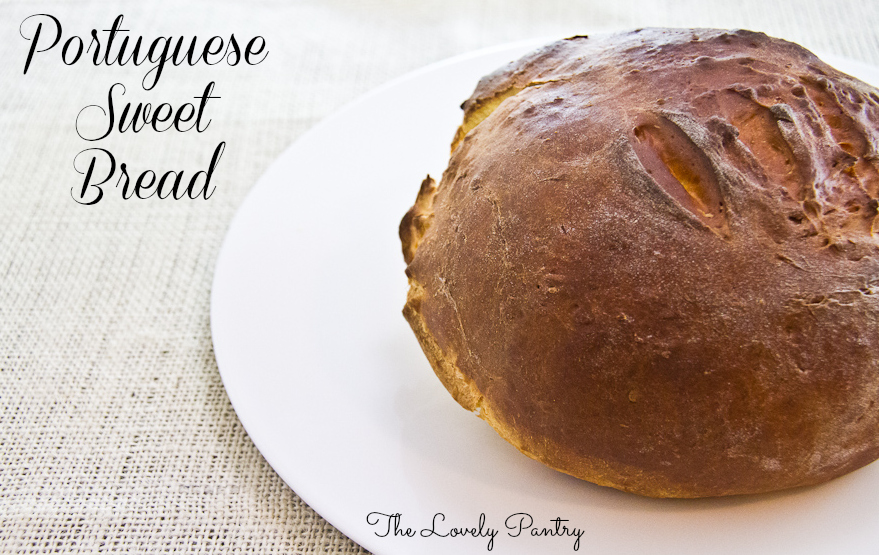
Portuguese Sweet Bread {No Knead}

Feb 13, 2013 by

I think I’ve been converted. As I told both my Brother and my Best Friend…we will never go hungry – Lyn knows how to make BREAD! Why is it that I did not take the plunge sooner? Every bread recipe that I see now, I take a second glance to see if its one that I can do. My husband has even started to request bread with specific ingredients. Well, ‘scuse me Mister! When did I become the bread lady? Ok fine…*taking notes* He knows I’ll try 🙂

I am a true lover of bread. Give me bread and butter and I’ll be okay. I grew up in a bread household. If there was anything that we always had – it was bread. And for that, I’m thankful. I’m also thankful for the Kindle book that I got from Amazon with all these wonderful bread recipes. Its called Easy Fabulous Bread Making. A Collection of quick, no knead, homemade bread recipes. I feel that it has helped me jump right into bread making, giving me the confidence as a beginner to make fresh bread at home! I like the technique, so when I’m good with this, I can move on providing that my wrists can take the pressure. Bring on the BREAD!

Today I’m sharing a bread that we fell in love with. The texture, the flavour – it was lovely. I forgive myself for the really thick slice that I cut for a late night snack. Portuguese Sweet Bread – I heart you!
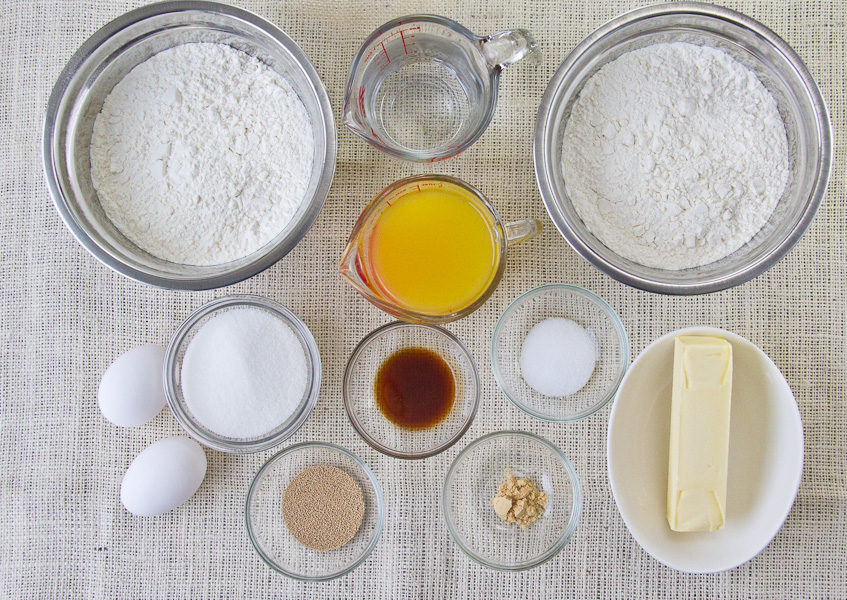
 

Portuguese Sweet Bread


Portugese Sweet Bread {No Knead}

Ingredients

  • 1 Cup Milk (I used 2%)
  • 1 Egg
  • 2 Tbsp Unsalted Butter, Softened
  • 1/3 Cup Sugar
  • 1 Tsp Salt
  • 3 Cups All Purpose Flour, Unbleached
  • 1 Tsp Yeast (Active Dry)

Instructions

  1. Proof your yeast
  2. In a large bowl, mix butter, sugar and eggs until combined.
  3. Add milk, then mix.
  4. Add activated yeast mixture. Mix to combine.
  5. Gradually combine flour and salt until fully incorporated
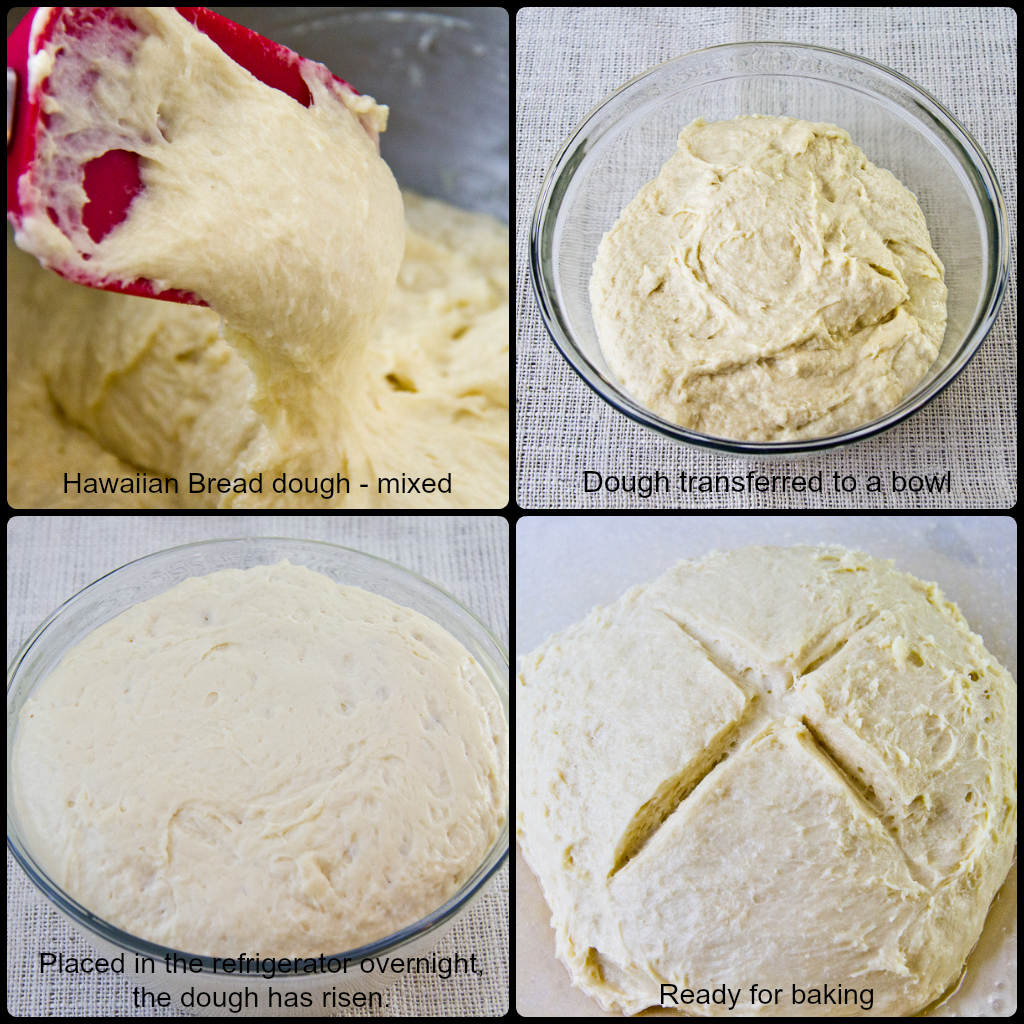
  6. Transfer to a large bowl and cover loosely with saran wrap
  7. Store in the refrigerator for at least 8 hours up to 5 days
  8. When ready to bake
  9. Preheat oven to 375
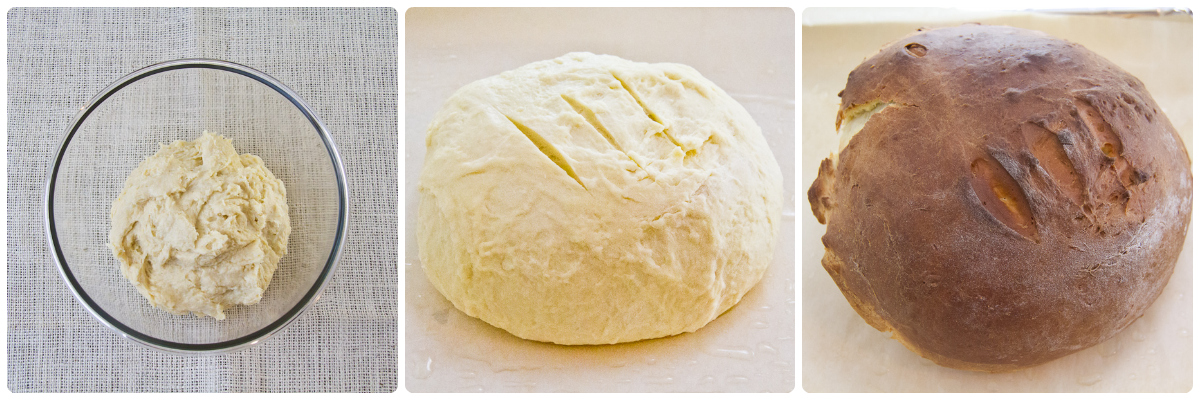
  10. Remove from fridge and place on a well floured surface. The dough will be sticky.
  11. With well floured hands, stretch ends underneath a few times to create a boule. Place the boule seam side down on a well oiled baking sheet. Cover for about 30 minutes.
  12. Bake for 30-35 minutes
  13. Allow to cool for about 10 minutes before transferring to a cooling rack
  14. Allow to cool for 30 minutes before cutting
https://lovelypantry.com/2013/02/portuguese-sweet-bread-no-knead/


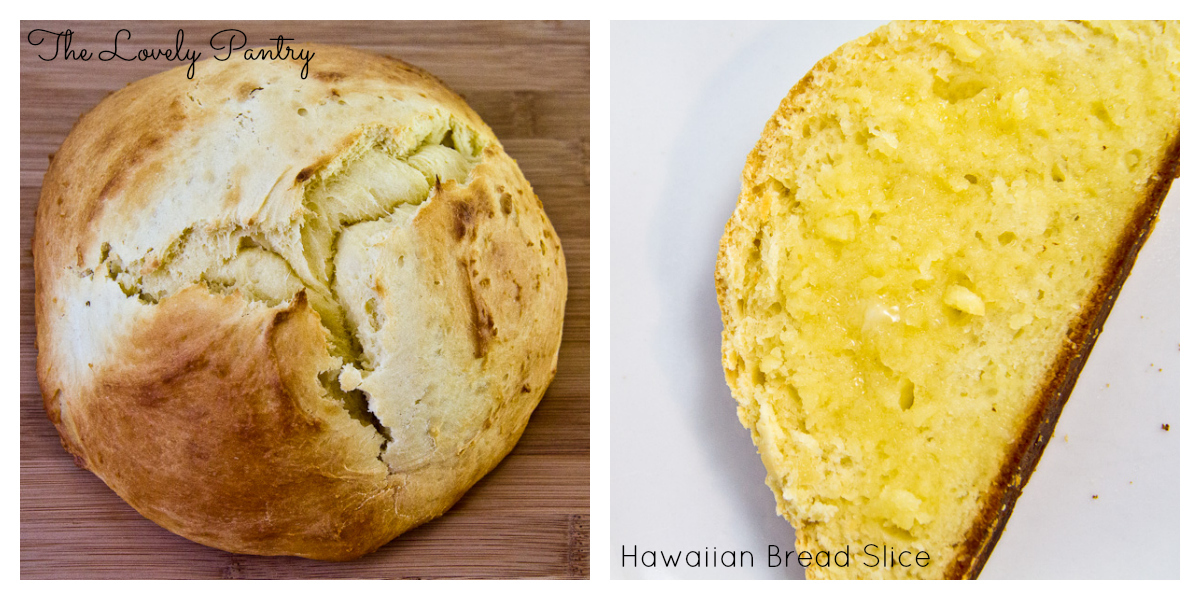
This bread seemed easy enough to just mix by spoon. But it was a breeze using my standing mixer. This dough takes no time to come together.


Portuguese Sweet Bread Collage


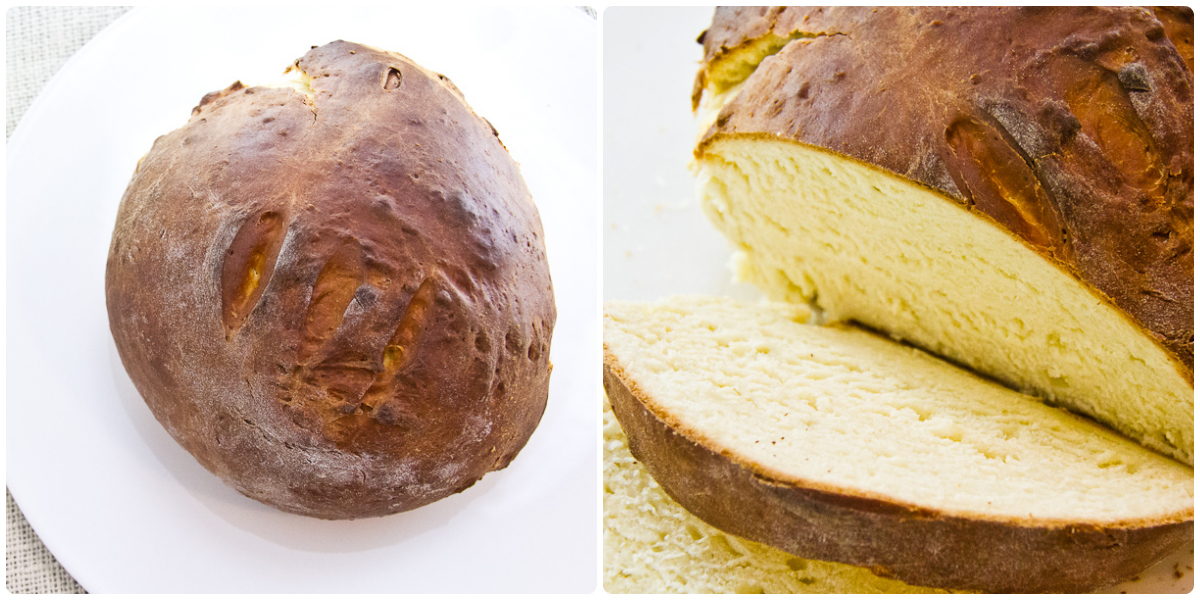
The exterior is crusty but not hard. The bread itself – soft, chewy, slightly sweet and an absolute delight to the palate. Perfect with butter or cream cheese.


Portuguese Sweet Bread Sliced


I love that I just popped a slice in the toaster and topped it with cheesy scrambled eggs. Breakfast has never been so satisfying. One centre slice goes a long way!


Toasted Portuguese Sweet Bread, Scrambled Eggs with Cheese, Bacon

Toasted Portuguese Sweet Bread, Scrambled Eggs with Cheese, Bacon


Funny how bacon seems to be making an appearance quite often these days…


read more

Hawaiian Bread

Jan 31, 2013 by

I did  it!! I got my list of breads that I would like to make, and went for it. I feel so accomplished right now. Making bread has been on my culinary bucket list since forever. I have been quietly saving, comparing, pondering recipes for some time now. Of course, Pinterest is where I store many bread recipes, but I have also been looking in books, magazines and e-books too. You’d be surprised to know how many free Kindle e-books are available on Amazon as a promotion. Either free or cheap. Either way, I’m all over recipe books.

This bread was very different to me. I had no idea how the taste/texture would be but I thought it was pretty cool that pineapple juice was an ingredient. When I took the bread out of the oven, I started taking pictures with my phone. I had to tell my friends and loved ones what I did! This is the kind of news that can’t be kept to myself!


Hawaiian Bread


Hawaiian Bread

Prep Time: 20 minutes

Cook Time: 40 minutes

Total Time: 60 minutes

Ingredients

  • 1 Cup Pineapple Juice
  • 1 Cup Water
  • 1/2 Cup Sugar
  • 1 1/2 Tsp Salt
  • 2 Tsp Active Dry Yeast
  • 1/2 Tsp Ground Ginger
  • 1 Tsp Vanilla
  • 1/2 Cup Unsalted Butter, softened
  • 2 Eggs
  • 5 Cup Flour, Unbleached

Instructions

  1. In a medium bowl, add flour, salt and ginger. Whisk to combine.
  2. In a large mixing bowl, cream butter and sugar.
  3. Add eggs, vanilla and pineapple juice. Mixing after each addition.
  4. Add proofed yeast and mix in.
  5. Gradually add 2 1/2 Cups of the flour mixture and mix until fully combined.
  6. Add the remaining flour and mix again.
  7. Transfer to a container and container and cover loosely with saran wrap.
  8. Refrigerate for at least 8 hours up to 5 days. (Overnight works well)
  9. Divide your dough in two portions and form into boules by folding the ends underneath and placing on a greased baking sheet - seam side down
  10. Make an "X" at the top of the boule.
  11. Bake at 350F for about 40 minutes
  12. Remove from oven and allow to cool for about 30 minutes

Notes

This recipe is from Kindle eBook "Easy, Fabulous Bread Making: A Collection of quick, no-knead, homemade bread recipes" by Barbara Mack

https://lovelypantry.com/2013/01/hawaiian-bread/


Ingredients for Hawaiian Bread

Ingredients for Hawaiian Bread


Just to clarify, in the photograph above, I have 2 bowls with flour. I split it but realized after that I didn’t need to do two portions.

One of the things I loved about this type of bread, is that it requires no kneading. This is a very important aspect of the recipe for me. Why? Well because kneading wouldn’t be a good thing for me to do. A few months ago, I developed tendonitis in my right thumb joint. So something as simple as writing can be slightly painful. I fully realize that the hours spent on the computer and on my cell phone are wreaking havoc on my hands. My left wrist is showing signs of stress also. I was advised to step away from the computer. Chances of that happening are pretty close to nil, although I have decreased my online activity a little. Less time on the computer doesn’t mean I’m resting though. Because I’m in the kitchen making AWESOME breads like this one!

I was so excited about making this bread that I went ahead and prepped 2 more no-knead breads. That’s another great thing about this recipe. You can prepare from the night before so you can have fresh bread in a jiffy. Also you can store the dough in the freezer for up to 3 months, and take it out as needed. Just allow it to thaw and rise again in the fridge.

I learned something about yeast while making this bread. When using Active Dry Yeast, you have to proof it before you incorporate it into the batter otherwise the dough wont rise. Lesson learned. No more wasting ingredients!

Proofing your yeast

In a small bowl, add 1 package of active dry yeast (about 2 1/4 Tsp). Add 1 Tsp sugar and 1/4 cup of warm water. Allow to stand for about 10 minutes. If the mixture starts to foam and increases in volume, you can use it in your recipe. If it doesn’t foam, discard it. I added the yeast to the wet ingredients just before adding the dry ingredients.


 Hawaiian Bread Prep Collage2


Is this bread perfect? I’m not sure. It’s my first homemade bread. It tasted much different from the commercially made bread that I have become accustomed to. But I’ve always heard that once you start making bread at home, you may not want to go back to store-bought bread. We’ll see!  I probably don’t have the perfect technique when it comes to bread making yet, but I’m looking forward to learning more and most definitely baking more. I can’t wait to make the second portion of this recipe. And then some other recipes from the eBook.


Hawaiian Bread Slice2

 I’m really happy.

No no-knead recipe is safe now that I’ve made my first bread.

I’m sooooo doing the happy dance right now.


Related Posts Plugin for WordPress, Blogger... read more
Post Popularity Graphing by Knowledge Ring